Sunday, October 3, 2010

Ménage à Trois


Here is a quick post with a pic of some of the stuff Adeptus-B has created for our Dark Heresy campaign (the terrain will perform double duty in Necromunda battles).

Center-front is our beloved boss, Inquisitor Montag. Flanking left and right are yet-to-be-encountered NPCs. The OSL effect applied to the psyker/sorcerer is fantastic!! The near background is a small utility vehicle, and the building they are all standing on, as well as the building in the far background are true to the style of Necromunda.

Thursday, September 16, 2010

Imperial Time


I was at my local watch/jewelry repairman the other day to have a bracelet fixed. While I was waiting, I spotted pieces to a watch face and mechanism on his work bench. I noticed the "pip" for the 12-spot was missing and asked the craftsman if that was a work in progress, or was something destined for his "bitz box". As you can see above, I came home with the watch face and added a few Forge World brass-etched adornments.

I plan to use this as a clock on the exterior of some yet-to-be-built administratum building.

Wednesday, September 15, 2010

Pulp Figures Order

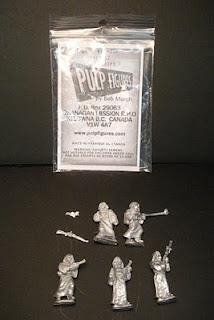
I recently placed an order with Pulp Figures and the package arrived the other day. We needed some NPC's for our Dark Heresy campaign, so I picked up a pack of Gasmask Cultists Troops 1 and Weird Villains 1.


This was my first order from the company and I was quite pleased with the items received. I was really surprised that one figure in each pack came with 2 hand/gun options. Very light mold lines/flashing are present on only a few pieces. The metal is hard and does not bend easily (I consider that a plus, but for any conversion work it would be undesirable).

I wasn't too concerned with the figures looking smallwith the larger heroic-scale minis commonly produced today -- 1) Much of my collection pre-dates 3rd edition WH40K and 2) its OK (IMO) that NPC's are smaller/less-dramatic than our PC's. Well, it turns out the Pulp Figures line are right to scale in height next to other figures I had on hand. However, the head and hands are more realistically scaled than most GW/Citadel figures, and that is what is more apparent to me in a side-by-side comparison.


Pictured lect to right:

1. Gasmask Cultists 1, Pulp Figures
2. Imperial  Catachan, Citadel Miniatures
3. Rogue Trader era Pirate, Citadel Miniatures
4. Necromunda Redemptionist Leader, Citadel Miniatures
5. Necromunda Orlock Juve, Citadel Miniatures
6. The Crimson Scorpion, Pulp Figures

Tuesday, July 27, 2010

Ambush!

Our group waiting to ambush the enemy!

My gaming group gets together 1-2 times a month to play Dark Heresy. During our last session, we only had time for a short encounter and some minor bookkeeping and narrative. Here is an overhead shot.


We (most of us) decided to help out a bounty hunter capture a wanted man. This is our group (minus 2) setting up an ambush for said marauder leader and his crew. We just stole their truck (in the foreground), drove it a few blocks away, and waited for them. The bounty hunter stayed back to follow them along an alley. We timed this attack to coincide with a raid (A bunch of angry natives of this planet were trying to rescue a sacred beast on the other side of town).

[picture placeholder] 

I must say that this attack was executed to near perfection. Quintillia waited for the leader to enter the killzone and just as she was about to fire, the leader spotted our ambush (hence "near perfect"). Our bounty shot first and hit!! Fortunately, the building absorbed enough of the blast that Quin still got her shot off -- a solid hit. The rest of the marauders scattered to the side streets - one of them within 3 meters of me!! Point blank full-auto burst from my autopistol sent the marauder flying back 9 meters in a red mist (best shot of the night IMO!!). The marauders started to break at this point, and Karrl and the bounty hunter took out a second grunt.

[picture placeholder]

On the fourth round, Karrl, Quin and the bounty hunter ganged up on the leader and subdued him. The bounty hunter took the prisoner to the enforcer's station, while we looted (and later sold) everything else. We did our best to make this attack look like it was part of the violence from the planet's natives.

Friday, July 23, 2010

Still Here!


I'm still around, but lately not very active in the modeling/gaming hobby. About a month ago I started getting double vision. My docs are still working to find the cause and hopefully it is not the tumor returning.

I have a building project that I have been trying to finish up for a Dark Heresy encounter run by Adeptus-B, but i get fatigued quickly and sometimes get headaches too. Needles to say it is not done yet.

In the mean time, Adeptus-B has finished compiling the story to date for our Dark Heresy campaign. It turned out to be very long, so after he breaks it up into a few smaller chapters, I will take some photos of re-staged encounters and post everything here.

Zorcon

Thursday, June 17, 2010

A spaceport in the outer rim...


At our next session. my Dark Heresy group will be landing an a somewhat desolate spaceport on a desert-like planet.

I mentioned in this post that Adeptus-B is planning to make enough buildings by our next session to densely cover my entire gaming table. All his buildings will be made with packing material, so I decided to keep with that theme when I decided to add my own "little" entry to the project.

The above pic is the building's current state. I have (and will be) taking pics throughout the building process These will be included in a later post. The elevated rectangular "roof" is not the landing pad, but a area for smaller buildings to be stacked. Adeptus-B said the spaceport has a "Mos Eisley" feel to it... so think of a small Docking Bay 94 (where the Millennium Falcon was docked in Mos Eisley)

I am also making a second building with the Mos Eisley style in mind (although not with packing material per se)...

Happy Birthday

Well, my blog is 1 year old! Its been a lot of fun, and I hope I am still sharing my hobby with you all next year!

Here are a few pics of some Dark Heresy NPCs made by me friend Adeptus-B.


Monday, June 7, 2010

Walls & Barricades Complete


I actually finished this project about a week and a half ago, but took some pictures I didn't really like. The delay in re-shooting and posting was brought on by my vast health improvements and taking on a number of home renovations projects.

This was a really fun project and I look forward to using them in a game. Adeptus-B will probably find a use for them in our Dark Heresy campaign too!!


I made six 6" sections in total, with two "heavily" damaged. Originally the two damaged sections were going to be gates, but I later decided against that.

 I also added the static grass to the electric posts...


My next project will be to add to Adeptus-B's Space Port project.

You can find out how I built the cyclone fences in the first part of this article over at Walls & Barricades.

Space Port part 1


Just a quick introduction to this project. In Dark Heresey, we are going to spend a little time (Read: more than 2 sessions)  in a space port (sort of a Mos Eisely feel). Adeptus-B started churning out these buildings for our encounters. He wants to cover my gaming table (about 3.5' x 6.5') with various sized buildings, only leaving alleyways and thoroughfares. This is one of the small buildings, and there are about a dozen so far.

All of the buildings are made from packing material, with some being based on 1" pink foam board. A few of my smaller Necromunda buildings will be peppered in as well.


I will get pics of the other buildings up in a later post. Once it is fully assembled, I will take a few pics of the entire table.

Tuesday, May 25, 2010

My Dark Heresy Cadre of Acolytes

(click on image to enlarge)

Adeptus-B has recently taken the reigns from me as GM, and after running a 10 year long D&D campaign, I am very happy to be in the player's chair. We just finished our 7th session last weekend, and finally completed a "trial by fire" mission.  The prize: To become full fledged acolytes of Arelius Montag!! We are in the first part of out third rank, and have yet to earn out inquisitorial rosettes.

Above is a group shot of our cadre (from left to right):

  • Kaarl (Tech-Priest) - Custom figure by Adeptus-B
  • Aleric (Arbitrator) - Reaper Nova Corp Soldier by Zorcon
  • Denathor (Adept) - Custom figure by Adeptus-B
  • Quintillia (Assassin) - Daemonhunters Death-Cult Assassin by Zorcon
  • Nickodemous (Imperial Psyker) - Talisman Astropath by Zorcon
  • Venris (Cleric) - Custom figure by Adeptus-B
  • Varn (Skum) - Necromunda Scabbs by Zorcon

Everyone will receive an "upgrade" figure at some point (when appropriate). I am playing the Psyker, and as soon as I get Psy Rating 3, Ill swap to a new mini.

My best and oldest friend is playing the cleric and we have a great rivalry brewing. I am excited to see how this plays out! We are also both in the running for leader of the cadre to add even more tension between us.

Ill write-up a synopsis of the campaign in a later post.

Wednesday, May 19, 2010

Walls & Barricades


I Just (nearly) completed the above electric fence terminals. They are pretty simple... only need to add some flock to finish. All I did was take the models off the sprue and glue them to a 40mm base, added some rocks and basing sand, then painted them. I worked on these while I was finishing up a cyclone fence project I started a few years ago...


Items Needed (for each section of fence):

  • 2x Large Craft Sticks (tongue depressor size)
  • 3x Small Cylindrical Beads (approx 1/4" dia.)
  • 2x Wooden Skewers
  • 1x Barricade from the Battlefield Accessories Set
  • 1x Section of Household Screen
  • 4x Penny Sized Washers (or pennies)

Because craft sticks warp easily (heck, some of 'em come warped), I always sandwich 2 together with the grains/warp running opposite. I do this with all my wall barricades (as appropriate) as the craft sticks are 6" long and make a nice uniform base. When doing a bunch of them at the same time, I'll stack them all up and use 3 "C" clamps to hold them together while they dry.

After they have dried, I take them apart and clean the edges - sometimes glue will run out the sides. Then I glue the washers (2 between each post) on to give the final piece a nice weight, and keep the center of balance low.


Next, take the Barricade from the Battlefield Accessories Set and strip the 4 main prongs from the model. This will be used as the posts for the fence. I use hot glue to attach them to the craft stick base. Then I used some pre-mix spackle (any basing putty will do) to hide the washers and glob of hot glue. After drying, I glued on some mixed basing sand.

At this stage, I cut the skewers to length, cut the beads in half (down the length of the cylinder), and cut a rectangular shape out of the screen.  I eyeballed all the dimensions for each fence section. NOTE: Make sure the section of screen is cut at 45° so they create a cyclone fence diamond pattern -- not squares!


Lay the model on its side. Position the screen on the flat side of the posts. Then place one crossbar (skewer) in position and glue. I used super glue for the quick set time. Repeat for the second crossbar. Lastly, take the "C" shaped half beads and place them over the crossbar at each post... so it looks like a bracket holding the crossbar to the post. I have already primed them black, so its paint and flock left to finish.

I will probably add some bullet holes before I paint them. You also might be able to make out that two of the fence sections include some damaged (like someone has cut there way through). I'm not sure I like how they turned out (hence no pics) and I'm waiting to see them completed.

It's good to start getting some stuff off the project shelf again. I hope to keep it up!


PREVIEW: I started this project a few years ago too -- this is the stage I left them at. These pieces are "Dragon's Teeth" or anti-tank fortifications. I have 6 in total and will make a how to post about them when they are finished.

Monday, May 17, 2010

Red Heads Win!

 I'm Baa'ack!!

In the beginning of my gaming experience, I was a roleplayer (D&D), then I became a wargamer (WH40K), and eventually I fell to the darkside and became a [collectible] card-player (MtG). The time I spend playing these games ebbs and flows. But whatever game is on the playing table, the hobby of painting miniatures has always occupied part of my spare time..

Now, being well into my recovery, the last 2+ weeks have been fantastic! However, I just have not been able to put together enough stamina and/or motivation together long enough to get back to the worktable and work on anything of note.

My son Marcus with a hermit crab in hand.

What I *have* done over the last few weeks is spend time with the family. In particular a 2 night stay at the beach. I have also gotten back into Magic the Gathering after a 10 year absence from the game - Spurred on by Laertes, although it did not take much coercing.

I never played in a WH40K tournament... and I never even played a single game at my FLGS. However I have played MtG at my FLGS, at tournaments, and even took 8th in state. As I re-learn the game with slightly different rules and completely different cards, I came back to a familiar deck type - Red Deck Wins.


The deck type Red Deck Wins is an aggro-style deck that has remained popular and dominant in various forms and at various times in Standard format tournaments. The basic concept is simply to play the most aggressive creatures and most efficient burn spells to win as quick as possible.

My current deck looks like this:

Lands
14 Mountain
4 Arid Mesa
4 Scalding Tarn

Creatures
4 Goblin Guide
4 Hellspark Elemental
3 Plated Geopede
4 Ball Lightning
4 Hell's Thunder   

Instants
4 Burst Lightning
4 Lightning Bolt
4 Searing Blaze

Sorceries
3 Elemental Appeal
4 Earthquake

This is a recent incarnation. Most noteworthy, I added the pay 1 life lands, although the sideboard is still in flux. I'm not ready for it yet, but after some more playtesting with Laertes, Ill try this puppy out at a local tournament.

Friday, April 2, 2010

Leveraging Time (or Figure Fluffing)

This may be sacrilegious to some of you out there, but I hired a painting service to paint some of my miniatures. Now hold on there before you come at me with your sprue cutter... let me explain.

Since I have been out of commission healing up from surgery and getting my strength back, I have not yet been able to do any painting myself - heck, I haven't even been able to safely get to my my painting table without assistance until last week. So about 3 weeks ago, I contacted Trevy at www.trevyspaintingtable.com and asked if he would be interested in an unusual request. He agreed, and I sent him 20 figures (5 plastic Catachans, 5 plastic Orlocks, and 10 metal orc Blood Bowl figures).

Group shot of the entire order.

In a former life, I was a comic book colorist. I worked in Dark Horse's internal coloring department for about 5 years. In order to streamline the process and improve consistency, we had the pages fluffed/flatted prior to going to a single colorist (to add all the rendering and effects). Flatting is simply laying down flat colors behind the artwork. This allows the colorist to more quickly select areas to render, and from a production standpoint allows one colorist to easily complete one book (improving consistency).

Essentially, that's what I hired Trevy to do - flat my figures. I asked for his Level 1 service (without a varnish or any base work). I sent the figures assembled, so my cost was only 50¢ per figure! (plus S&H both ways). This will allow me to complete my figures much quicker! The shots in this post are the pics I was sent to approve the order. I don't have the figures in-hand yet, but at this point it is exactly what I wanted! Once I get the figures, I will add shadow and highlighting, and then base them properly, then finally matte varnish them.

 Catachans and Orlocks
These are for my Dark Heresy campaign and are stand alone squads.

Blood Bowl Orcs
These will need to match the 10 other figures on the team.


I will show complete before and after pics of this project in future posts.

These will be the first figures I own that have not been painted by me (If you don't count the pre-painted D&D and Star Wars miniatures) and is a little weird when I think about it. Please check out Trevy's site and see what he offers.

I think this is a great idea if you need to speed paint an army, or if you have entirely too much stuff on your project table! Base coating is my least favorite part of modeling, so I am really happy to have tried this idea. What do you think? Is this something you would consider?

Friday, February 26, 2010

Recovery Round 3

(Image used without permission)

I am finally home (again) after over a month in the hospital (minus a brief 6-day trip home). This procedure was only supposed to be a 3-4 day stay, but it turned into 3 surgeries, and a total of 12 days in ICU & 23 days in a regular hospital room.

I still have another week or two of recovery at home. During this time, I am not supposed to lift more than 5 pounds, cough, sneeze, sit up more than an hour at a time (or as tolerated), avoid stairs, or do any strenuous activities.

Over this endeavor, I have had many days to ponder my current projects (plus my desired future ones), and when I get back up to "painting strength" I will be re-prioritizing the "work bench que". However, right now the stairs to my garage (and my workbench) are more of a deterrent than my wife is (who stayed home from work to make sure I don't over exert).

Sunday, February 14, 2010

Back on my Feet... sort of

Well its been a week since I came back from the hospital, and I finally had the strength to get out to the workbench last night. I've spent 3.5 weeks on my back after 2 surgeries (there is a chance I am going back for a third next week), so I'm a little week in the legs right now.

I spent a few hours last night and a few hours today painting. I didn't worry too much about completing any challenges or working on armies... I just painted what caught my eye.

The first thing I worked on was a small unit of RT era Penal Legion troops. The sergeant and 3 of the troops were acquired in the 80's and I recently picked up the other 2 troops from Laertes. They will perform double duty as Dark Heresy NPC's and members of a Rag Tag IG army I've been brewing up.

These guys were painted with a base coat, 3 layers of washes (2x Devlan Mud, 1x Badab Black), and then "highlighted" with the base coat.


I also worked a little bit on the wholesale repainting of my BFG Space Marine fleet by repainting a squadron of Hunter class destroyers, and painting 2 Grey Knight Strike Cruisers. I ordered the cruisers from Forge World about 2-3 years ago and I never got around to assembling them. The destroyers were ordered from GW around the same time, along with a pack of Gladius and Nova frigates and all three squadrons were painted straight away.

Thursday, January 7, 2010

Battlefleet Gothic on the Brain

Another subject that has been keeping me occupied over the last few weeks is Battlefleet Gothic. Lately I have been trolling Google images and blogs, sketching out some plans for new terrain, and making plans to improve my existing terrain (a bunch of foam balls painted brown and glued on flight stands).

I have some Armageddon Sector ships and some Rogue Trader ships burning to get out of the box and get painted too... I may have to appease the pewter gods later this week.

There are three shelves of my "project organizer" dedicated to BFG: Imperial Fleet, Space Marine Fleet, and Generic (orbital platforms, space stations, rogue trader, terrain). I pulled all 3 shelves out to re-inventory what was done and in progress. Then I started assembling some of the ships from my stash.


[Edit] I wrote this yesterday, and scheduled it to post later today. But I got a little over zealous with things... there are far more projects than I mentioned in my last two posts that I actually worked on. This is a quick list off the top of my head of stuff that that I pulled out and started working on yesterday:

1. Aquilla Lander - I combined some of the smaller pieces of the Crashed Aquilla Lander terrain piece to make 3 pieces total. I traced the shapes onto foam core , and started gluing them to their base.

2. Blastscape - I started trimming the flashing off the edges.

3. Necromunda Objective Markers - I worked a bit on 5 objective markers discussed in this post.

4. Fences & Walls - I fussed around with a WIP cyclone fence project and some resin tech walls.

5. Bases - I trimmed excess plasticard off of WIP urban bases for my Adeptus Arbites squads.

6. Hills - I recently bought a new foam cutter and experimented with cutting out different shapes and textures. I have had a "P" shaped foam cutter for years, but before Xmas, I purchased a straight "I" shaped cutter.

7. Necromunda Terrain - I have a bunch of small (about 60-80 mm) terrain pieces for Necromunda. They are mostly stacks of crates and oil drums that we position around the board to add cover and they are based on square patches of plasticard. I decided it would look better to trim the plasticard to the shape of the actual foot print of the pieces. Since I had bashed some of the terrain to work on my Necromunda objective markers, I had some loose pieces, plus I have some new WIP pieces. I played around with combining different pieces to create both small and large finished pieces.

8. Drones - I assembled (and magnetized) 4 Tau shield drones from my stash, and completed assembly on the 4 converted WIP shield drones. I completed 2 WIP marker light drones, and started 2 converted marker light drones.

So much for taking it easy until surgery!!

Dark Heresy Character Sheets

We only played 2 sessions of our new Dark Heresy campaign before my health issues put it on hold. But during the break I have managed to finish up a custom character sheet. I made it compatible with both Dark Heresy and Rogue Trader.

The border art, logo and background watermark are IP of Games Workshop and/or Fantasy Flight Games.


Designing character sheets is something I have always done for the campaigns I have played in. Back in grade school (and 1st edition D&D), I bought paste-up boards from a local art supply store and hacked up photocopies of "official" sheets, then used a tech-pen and straight edge to create my own character sheets.

[Edit] Here is a link to a PDF file of the character sheets. It is set up with crop marks to print on an 11" x 17 " sheet of paper so there is no white boarder (required trimming). However, there should be no issues printing this file to a standard 8.5" x 11" paper size.

Wednesday, January 6, 2010

WIP: Necromunda Objectives

I am still waiting for my surgery to be scheduled, but I'm getting a little stir crazy in the meantime. As I sit reading blogs, and writing army lists the temptation to get back to the workbench was too strong to resist. I spent about an hour the other day, and a few hours today working on some objective markers.

As typical of my nature, I often start projects before I complete the ones already in progress. So I did not work on my TOEMP projects, or my Tau army, or even any WH40KRP NPCs. I was inspired to work on Necromunda terrain. I started by making sketches of buildings that were never finished by adding detail, or making changes to parts I didn't like. Then I started digging around in my terrain boxes, and pulled out a few small pieces. I decided to make some Necromunda objective markers in the same vain as my Tau objective markers, that I could also use for an IG/Arbites force.

I wanted the Ammo Dump to look like a pallet of supplies that the looters were chased off in mid raid. The painted parts were lifted off existing terrain pieces.


This is a rat coop. It could also house blood beetles, giant slugs, blind snakes or mutant dogs. The door slides up and down and is removable. There is room for a std figure, so this could be used as a makeshift prison for a rescue mission too.


For this piece, I took a hatch that wasn't based, or attached to anything. I simply added some detail and a partially demolished bulkhead.

The waterstill is mostly unchanged, except for adding a valve and faucet, and mounting to a detailed 60mm base.


The last piece was a computer terminal that was inspired by the scene from Star Wars where Old Ben was on the Death Star turning off the tractor beams. I have evolved it into a coms tower.