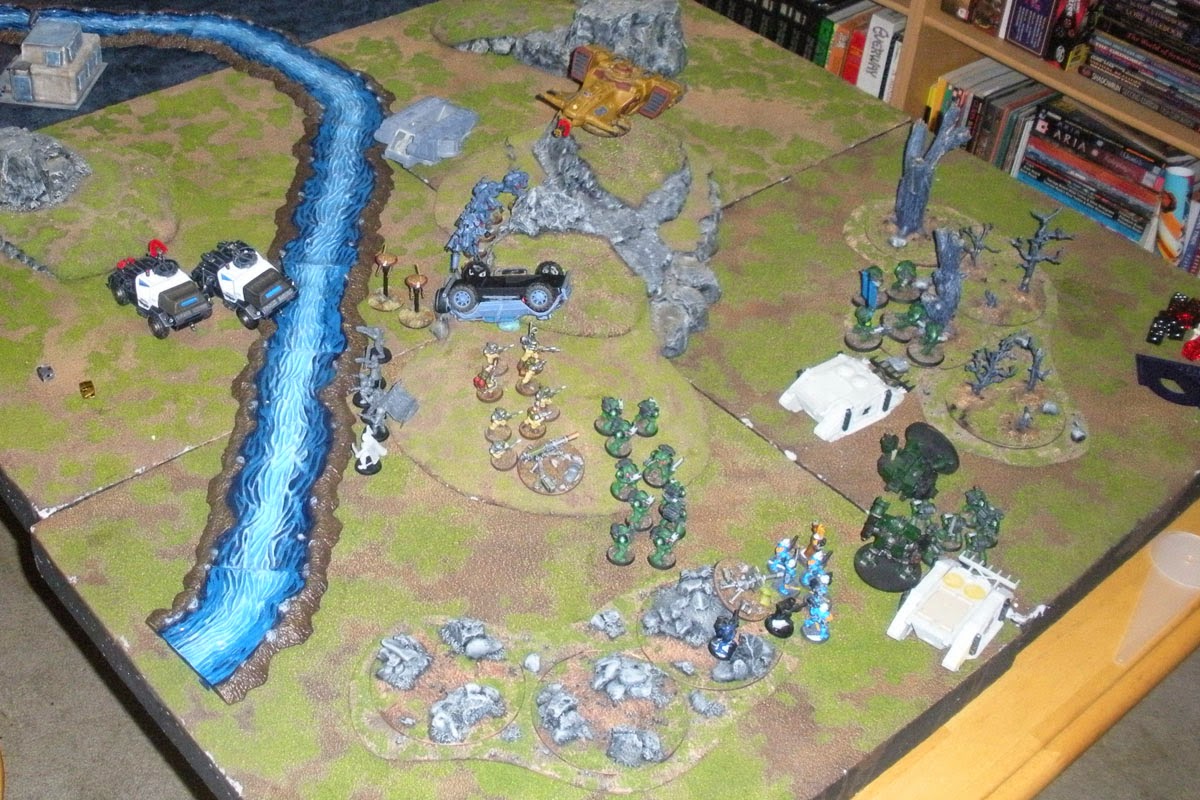
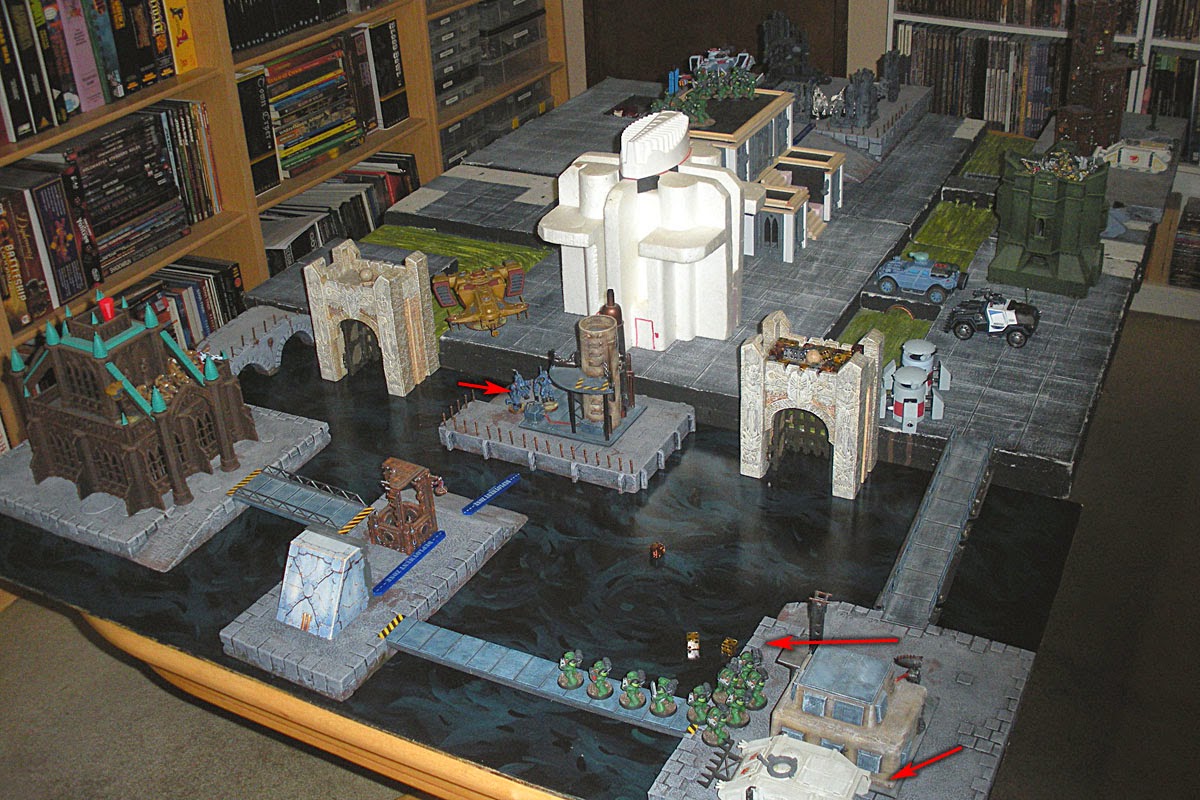
A small update.
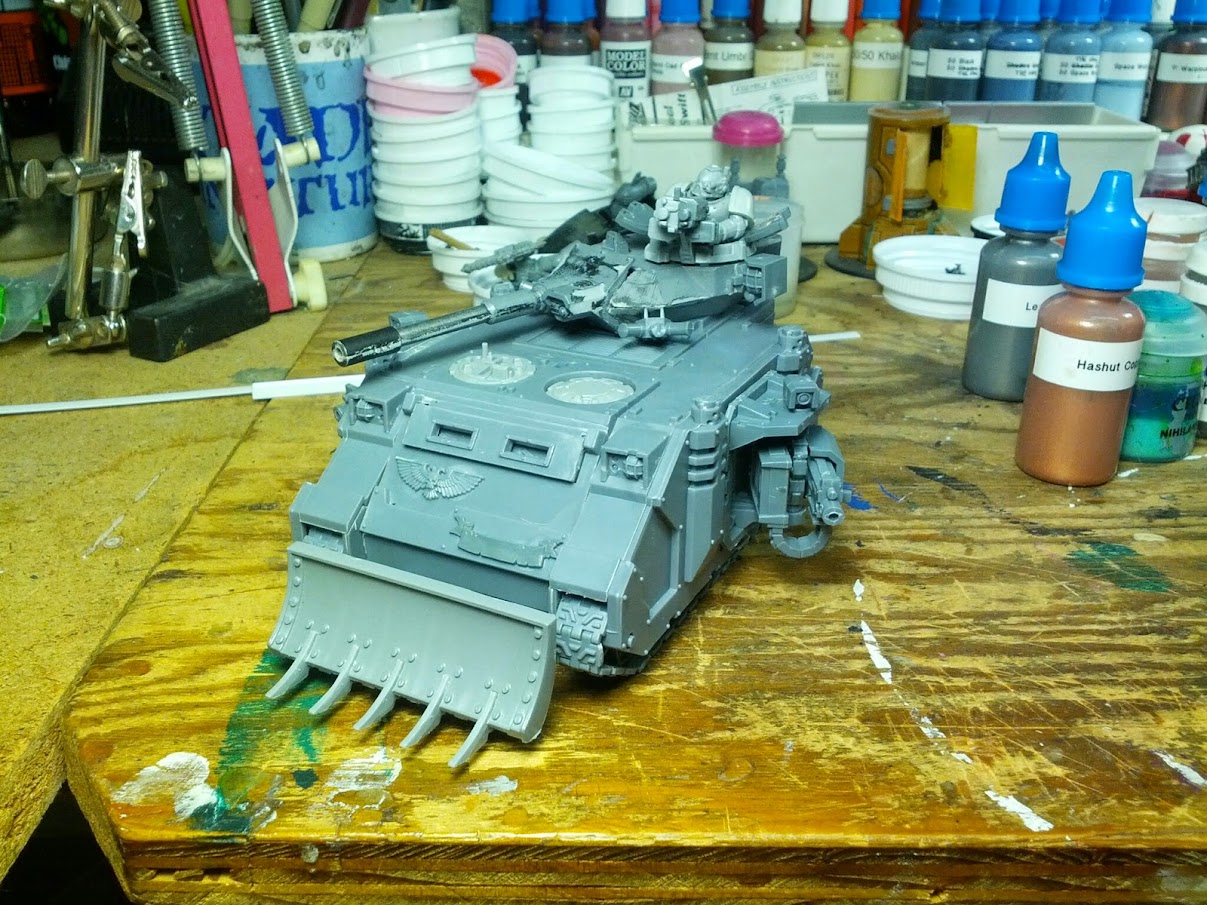
I couldn't find a set of standard Predator Sponsons plus weapons within my budget of $10. But I was able to score a pair of Baal Predator Sponsons.
The Blood Angel marking were scraped off with a hubby knife. I also drilled out the barrel. For now Deathbot will have to settle for Heavy Bolters, but I will magnetize the assembly so that Lascannons can be added at a later time.
Here is the tank assembled and waiting for primer.
Showing posts with label Salamanders. Show all posts
Sunday, November 16, 2014
Thursday, October 23, 2014
WH40K Salamander Dreadnoughts WIP (part 4)
These are not action figures! :)
This project, let's call it 'Phase 3', has been sitting on my desk for about 10 months--Not counting the time spent on the game table, or being carted around in Deathbot's army box. About 4 weeks ago, I finally started adding highlights over the base colors. To be frank, I almost didn't.
I spruced these guys up with some pieces from other models I've collected over the years. Some were glued on, but some were attached temporarily by poster tack... more on that in a bit.
Progress has been slow on these two, but they getting close. Although I am second guessing the edge highlighting on the left dreadnought, and may use a different highlighting technique.
As seen in this image from a post last February, the dreadnoughts each *had* 2 'shoulder' mounted pieces. They were attached with poster tack. This works great for testing how a finished models will look before gluing. It actually held well enough (in this case) to survive the gaming table and moderate handling.
Deathbot has loved his space marine figures. Phase 1 was completed over 5 years ago, and was My First Blog Post. Over the years, I restricted how often and where he could play with the figures. As the frequency of broken guns and back pack lessened, so did my restrictions. This year, Deathbot has has shown he is very careful with his army, so I let him take the dreadnoughts to his grandparents. The day he got back from that trip, he had some friends over and the space marines were brought out to bolster an epic Lego mini figure battle.
The next day, I asked Deathbot to clean up the aftermath, including put away his Salamander army, and put the box on the shelf. As I occasionally do, I took inventory*. Everything was there, but the shoulder mounted bits. I looked through his Lego bin for about 20 minutes, and Deathbot looked around the room for about an hour. They were gone.
* I normally do not scrutinize how Deathbot treats his things. While Mrs Zorcon and I try and instill respect and responsibility,not having said toy/item anymore is the 'punishment'.
To the point of the sub-title of this article--"These are not action figures" (I went back and forth about how to phrase that. My first iteration was "These are not toy soldiers"). Well, in fact, they are game components--Sometimes pricey ones at that. On that note, I debated weather to replace the bits and/or to shelve the project indefinitely. Eventually, I chose to buy more bits on 'fleaBay', costing about $12, and finish the models. In the mean time they will stay on my work bench and not in Deathbot's carrying case.
In the end, I know these aren't precious stones or irreplaceable valuables. But they are customized painted models specifically for use in game... or simply put, toy soldiers.
This project, let's call it 'Phase 3', has been sitting on my desk for about 10 months--Not counting the time spent on the game table, or being carted around in Deathbot's army box. About 4 weeks ago, I finally started adding highlights over the base colors. To be frank, I almost didn't.
I spruced these guys up with some pieces from other models I've collected over the years. Some were glued on, but some were attached temporarily by poster tack... more on that in a bit.
Progress has been slow on these two, but they getting close. Although I am second guessing the edge highlighting on the left dreadnought, and may use a different highlighting technique.
As seen in this image from a post last February, the dreadnoughts each *had* 2 'shoulder' mounted pieces. They were attached with poster tack. This works great for testing how a finished models will look before gluing. It actually held well enough (in this case) to survive the gaming table and moderate handling.
Deathbot has loved his space marine figures. Phase 1 was completed over 5 years ago, and was My First Blog Post. Over the years, I restricted how often and where he could play with the figures. As the frequency of broken guns and back pack lessened, so did my restrictions. This year, Deathbot has has shown he is very careful with his army, so I let him take the dreadnoughts to his grandparents. The day he got back from that trip, he had some friends over and the space marines were brought out to bolster an epic Lego mini figure battle.
The next day, I asked Deathbot to clean up the aftermath, including put away his Salamander army, and put the box on the shelf. As I occasionally do, I took inventory*. Everything was there, but the shoulder mounted bits. I looked through his Lego bin for about 20 minutes, and Deathbot looked around the room for about an hour. They were gone.
* I normally do not scrutinize how Deathbot treats his things. While Mrs Zorcon and I try and instill respect and responsibility,not having said toy/item anymore is the 'punishment'.
To the point of the sub-title of this article--"These are not action figures" (I went back and forth about how to phrase that. My first iteration was "These are not toy soldiers"). Well, in fact, they are game components--Sometimes pricey ones at that. On that note, I debated weather to replace the bits and/or to shelve the project indefinitely. Eventually, I chose to buy more bits on 'fleaBay', costing about $12, and finish the models. In the mean time they will stay on my work bench and not in Deathbot's carrying case.
In the end, I know these aren't precious stones or irreplaceable valuables. But they are customized painted models specifically for use in game... or simply put, toy soldiers.
Tuesday, September 2, 2014
Salamander Tanks WIP
New additions to Deathbot's Salamander force.
I assembled a pair of tanks the other day. Both of these were hand-me-downs from Laertes from his last purge just before moving to Arizona.
Land Raider. This was my first "modern" imperial tank build. I added the quotes because(I don't think this is the current version of the model. All of my previous tank builds are from the Rogue Trader era.
I am going back and forth weather or not to magnetize the doors and sponsons. In the meantime, I need them off to prime the interior.
Predator. My second "modern" tank! The kit was actually a Chaos Rhino. I put the chaos sprue in my bitz box, and added a turret aquired from a previous eBay purchase. The turret was broken when I got it and needs some green stuff repair.
Currently, I am looking for a pair of Predator sponsons with weapons for around $10-12 or without for about $6-8 to finish up the build.
I'm not sure if the kits were missing the accessory sprues when I got them, or if I had already canalized them. Whatever it was, when I dug the models out to build them, there were none to be found. Fortunately, I have plenty of hatches in my bitz box. However, I was all out of smoke launchers and searchlights. Since taking these pictures, I found a set of 10 of each on the ever-giving eBay for about $12.
Here is the most recent Progress Chart. There is a lot of painting ahead, and Deathbot reminds me every day!
Until next time!
Tuesday, August 26, 2014
40k BatRep – Space Marines vs Tau 1750 pts
A 3 on 1 game! Deathbot invited two of his neighbor friends to play.
Jay and Dom live next door. They came over to visit during Deathbot's and my last game. They showed enough interest in the game, I decided I would endeavor to play 40K with a 6, 9, and 11 year old! To my surprise, all three kidos stuck it out for 6 hours!!
At first we were going to play 2-on-2 (the youngest on my side), but after Jay and Dom arrived, the three compatriots decided to "gang up" on me.
They agreed to split up Deathbot's Army between them. I pulled Deathbot aside and suggested he let his friends choose first--He happily agreed!. After a 15 minute Q&A about each unit/vehicle, it was settled: Jay took a Tac squad and the Lord Commissar/Command Squad, while Dom took both IG Vet Squads. Deathbot controlled everything else with the understanding he would lend a unit to Jay or Dom if they lost one of theirs.
ARMY LISTS
This time Deathbot wanted to use his Scout Marines. I tweaked his list around to accommodate the addition.
I did not change my list from the previous game.
SETUP
We rolled for the mission: Annihilation/Spearhead. I like to stand next to the book shelves (far side of table), plus there is much more "wiggle" room for the three boys on the other side. So I chose sides, letting them place and go first.
This was very much a learning game, but I took plenty of pictures anyway.
TURN 1
Jay and Dom chose to deploy already disembarked from their vehicles. Deathbot chose not to, kept all Deep Striking models in Reserves, and Infiltrated his Scout Marines on top of the tall red building.
I deployed evenly across my table edge, Infiltrating the Kroot, and keeping all my Deep Strike troops in Reserves.
No casualties this turn.
TURN 2
In the middle of the board, all three Chimeras and the Predator fired at my Fire Warriors. To my left, Team Deathbot focused everything else at my Kroot. Surprisingly, I took far less casualties than I expected.
My Hammerhead trashed the Scout Marines, and my pounded a Tac Squad.
TURN 3
The boys decided to bring more forces against my Kroot. They placed the Terminators in assault range and diverted the Commisar, IG Command Squad and a Chimera. I lost 10 Kroot that turn.
My Fire Warriors did nothering. But my Kroot destroyed a Dreadnought. Then my Commander and Bodyguards arrived, disarming a Chimera.
TURN 4
The hail of fire raining on my Kroot finally burned them all out. The kids were ecstatic with their victory!
Unfortunately for them, my Hammerhead had not missed all day. Predator destroyed. Another bout of bad luck for the boys came when I tried to place my Stealth Suits in the middle of their main force. The Suits scattered to the back side of the hill, giving them full view of a Chimera side armor. Dead Tank.
TURN 5
After loosing 2 tanks last turn, the boy's stopped working together--They each chose what to do independently without consultation with their team. I strongly suggested they do not split up their force as I still had two units in Reserve. But they did not take my advice.
Dom went after my Commander and Bodyguards, Jay stuck it out with my Stealth Suits, and Deathbot made a dash towards my Fire Warriors. They caused zero damage.
I tried to place my Crisis Suit Team in front of the on coming Space Marines in an effort to protect my Fire Warriors and Fire Blade. I scattered off the table. The kids were able to place the unit. This made them laugh out loud. They placed the unit to the far side of my Fire Warriors.
The last Scout Marine was hiding in the grey church. 28 Pulse Rifle shots failed to take him out 2 turns in a row! The boys conveniently placed my Crisis Suits right next to him. Dead Scout.
TURN 6
By the time turn 6 started it was pretty late. Everyone was tired and loosing focus. The boys rushed through their turn, knowing they lost.
Things were getting a bit tedious for me in the last two rounds. 40K isn't the most complex game, but at 1750 points and wrangling 3 young boys, my patience was definitely tested! But in the end, fun was had by all! That's what counts, right?
Jay and Dom live next door. They came over to visit during Deathbot's and my last game. They showed enough interest in the game, I decided I would endeavor to play 40K with a 6, 9, and 11 year old! To my surprise, all three kidos stuck it out for 6 hours!!
At first we were going to play 2-on-2 (the youngest on my side), but after Jay and Dom arrived, the three compatriots decided to "gang up" on me.
They agreed to split up Deathbot's Army between them. I pulled Deathbot aside and suggested he let his friends choose first--He happily agreed!. After a 15 minute Q&A about each unit/vehicle, it was settled: Jay took a Tac squad and the Lord Commissar/Command Squad, while Dom took both IG Vet Squads. Deathbot controlled everything else with the understanding he would lend a unit to Jay or Dom if they lost one of theirs.
ARMY LISTS
![]() |
| Space Marines with Imperial Guard allies |
This time Deathbot wanted to use his Scout Marines. I tweaked his list around to accommodate the addition.
- Terminator Captain (120): Iron Halo; Storm Bolter; Power Sword
- Dreadnought A (120): Searchlight; Smoke Launchers; Assault Cannon; Power Fist; Storm Bolter
- Dreadnought B (100): Searchlight; Smoke Launchers; Multi-melta; Power Fist; Storm Bolter
- Terminator Squad (210): Sergeant; Storm Bolter x4; Power Fist x4; Power Sword; Hvy Flamer
- Tactical Squad A (190): Sergeant; Bolt Pistol x10; Bolter x7; Chain Sword; Flamer; Hvy Bolter; Rhino
- Tactical Squad B (190): Sergeant; Bolt Pistol x10; Bolter x7; Chain Sword; Flamer; Hvy Bolter; Rhino
- Scout Squad (55): Sergeant; Bolt Pistol x5; Chain Sword x5
- Predator (150): Searchlight; Smoke Launchers; Extra Armor; TL Lascannon; Lascannon x2 (side).
- Lord Commissar (80): Carapace Armor; Bolt Pistol; CCW, Melta Bombs
- IG Command Squad (180): Company Commander; Flack Armor; CCW x4; Lasgun x3; Medi=Pack; Regimental Standard; Vox Caster; Plasma Gun; Chimera
- IG Veteran Squad A (180): Sergeant; Flack Armor; Melta bombs x10; CCW x8; Lasgun x7; Laspistol; Autocannon (HWT); Flamer; Grenade Launcher; Demolitions; Chimera
- IG Veteran Squad B (187): Sergeant; Carapace Armor; CCW x8; Shotgun x5; Laspistol; Grenade Launcher x2; Lascannon (HWT); Grenadiers; Chimera
![]() |
| Tau Empire |
I did not change my list from the previous game.
- XV8 Commander + Bodyguards (361): Fusion Blaster x3; Missile Pod x3; Plasma Rifle x3; Target Lock; Shield Drone x6
- Cadre Fire Blade (84): Pulse Rifle; Shield Drone x2
- XV8 Crisis Team (273): Fusion Blaster x3; Missile Pod x3; Plasma Rifle x3; Shield Drone x6
- Stealth Team (170): Shas'vre; Fusion Blaster; Markerlight & Target Lock; Burst Cannon x4
- Fire Warrior Team (205): Shas'ui; Pulse Rifle x10; Devilfish w/ Disruption Pod
- Drone Sentry Turret Team (220): TL Burst Canons x4
- Kroot Carnivore Squad (260): Kroot Shaper; Kroot Rifle x20; Kroot Hounds x10; Krootox/Kroot Gun x3
- Hammerhead (177): TL Smart Missile System; Railgun w/ Solid & Submunitions; Disruption Pod; Seeker Missiles x2
SETUP
![]() |
| Deploy Zones tinted in red. |
We rolled for the mission: Annihilation/Spearhead. I like to stand next to the book shelves (far side of table), plus there is much more "wiggle" room for the three boys on the other side. So I chose sides, letting them place and go first.
This was very much a learning game, but I took plenty of pictures anyway.
TURN 1
Jay and Dom chose to deploy already disembarked from their vehicles. Deathbot chose not to, kept all Deep Striking models in Reserves, and Infiltrated his Scout Marines on top of the tall red building.
I deployed evenly across my table edge, Infiltrating the Kroot, and keeping all my Deep Strike troops in Reserves.
No casualties this turn.
TURN 2
In the middle of the board, all three Chimeras and the Predator fired at my Fire Warriors. To my left, Team Deathbot focused everything else at my Kroot. Surprisingly, I took far less casualties than I expected.
My Hammerhead trashed the Scout Marines, and my pounded a Tac Squad.
TURN 3
The boys decided to bring more forces against my Kroot. They placed the Terminators in assault range and diverted the Commisar, IG Command Squad and a Chimera. I lost 10 Kroot that turn.
My Fire Warriors did nothering. But my Kroot destroyed a Dreadnought. Then my Commander and Bodyguards arrived, disarming a Chimera.
TURN 4
The hail of fire raining on my Kroot finally burned them all out. The kids were ecstatic with their victory!
Unfortunately for them, my Hammerhead had not missed all day. Predator destroyed. Another bout of bad luck for the boys came when I tried to place my Stealth Suits in the middle of their main force. The Suits scattered to the back side of the hill, giving them full view of a Chimera side armor. Dead Tank.
TURN 5
After loosing 2 tanks last turn, the boy's stopped working together--They each chose what to do independently without consultation with their team. I strongly suggested they do not split up their force as I still had two units in Reserve. But they did not take my advice.
Dom went after my Commander and Bodyguards, Jay stuck it out with my Stealth Suits, and Deathbot made a dash towards my Fire Warriors. They caused zero damage.
I tried to place my Crisis Suit Team in front of the on coming Space Marines in an effort to protect my Fire Warriors and Fire Blade. I scattered off the table. The kids were able to place the unit. This made them laugh out loud. They placed the unit to the far side of my Fire Warriors.
The last Scout Marine was hiding in the grey church. 28 Pulse Rifle shots failed to take him out 2 turns in a row! The boys conveniently placed my Crisis Suits right next to him. Dead Scout.
TURN 6
Things were getting a bit tedious for me in the last two rounds. 40K isn't the most complex game, but at 1750 points and wrangling 3 young boys, my patience was definitely tested! But in the end, fun was had by all! That's what counts, right?
Friday, August 15, 2014
40k BatRep - Space Marines vs Tau 1750pts
Deathbot and I played another 40k game a couple weeks back. I present you 30+ images representing the battle.
Once again, I have sat on a battle report for about a month before posting it. At least I took plenty of pictures!
ARMY LISTS
Deathbot wanted more IG/AM allies this go around. I provided him with a squad of my Adeptus Arbites and a couple 'counts as' Chimeras.
Total Points: 1745
* As we were setting up, Deathbot wanted to use one of his new IG Heavy Weapon bases given to him by Adeptus-B. I replaced 2 of the members of the squad with a Lascannon Heavy Weapon Team. The point cost does not reflect this change.
I changed up my force a bit using my recently assembled Kroot and a never before used scratch built Drone Sentry Turret Team.
Total Points: 1749
SET UP
The terrain for this game is a small city with canals flowing into a larger river/canal. I have placed "islands" connected by bridges along the water edge.
The mission for this game was "Capture and Control" with a "Dawn of War" deployment. We both placed our "home base" objectives in opposite corners from each other.
Deathbot won initiative and deployed his IG HQ and 2 Troops, placing his commander with vet squad A. Both Chimeras were placed about 1/3 of the way from his left table edge.
I placed my Fireblade and Fire Warriors on the building roof occupied by my objective. The team's Devilfish was placed behind a building to lend fire support for approaching enemies. My Kroot infiltrated into the large grey church to my left of the board.
We both kept our deep strike capable units in reserve.
TURN 1
I siezed the initiative. The only unit left that was not in reserve was my Hammerhead. I moved it flat out to take cover behind the grey church. My Kroot fired at a Dreadnought
Deathbot brought on 2 Tac squads in Rhinos to his left then both Dreads and the Predator to his right. Before turn 2 started he realized his mistake by not placing a Tac squad by his Objective. I allowed him to redeploy a Rhino and Tac squad to his far right.
TURN 2
My Kroot continued to fire upon the Dreadnought, again to no effect.
Deathbot's entire right flank fired upon the Grey church, blowing it to smitherenes, killing about 6 Kroot Hounds. Deathbot did not advance, but maneuvered his Chimeras closer to the Bastion, disembarked both Tac squads, and laterally moved a Dreadnought.
TURN 3
We finally see some action this turn.
Vet Squad A and Lord Commissar arrive at the roof of the Bastion.
TURN 4
The advancing Tac Squad, under heavy fire, manages to take out the last two Stealth Suits.
The Kroot finally took out a Dreadnought arm, but have suffered significant losses by this point.
The Hammerhead still remains in deep cover, only letting loose its SMS.
Both Dreads advance as the Kroot hail of bullets switch targets and crack open the Predator.
This Tac Squad covers its Objective while firing at the Kroot, causing them to rout.
Not pictured is the exchange of fire between Deathbot's units on the roof of the central building and my unit behind it. I believe a couple Assault Marines and Shield Drones were the only casualties.
TURN 5
The Assault Marines charge the Crisis Team. I don't recall where the losses came from (last turn's shooting and this turn's charge) but in total 6 Shield Drones, and 4 Marines are lost.
I believe the Hammerhead fired at the Assault Squad just before the charged.
This Tac Squad continues to advance under heavy fire.
Kroot in full retreat.
The kill ratio has finally tipped to the Tau's favor.
TURN 6
My Commander and bodyguards finally show up on turn 6!!!! What?!? That can't be. Somehow we played an extra turn and forgot to count it. We had to stop a number of times and played over the course of two days, so I am not surprised that this happened.
We played on anyway. My Command Squad let lose a barrage of white hot energy and missiles, completely vaporizing the Terminator Squad.
Deatbot's two Dreadnoughts make it across the river, advancing towards the Hammerhead while the Kroot run for their lives.
This Tac Squad is almost whittled away, reduced to two marines.
The Drone Sentry Turrets blew up one of the Chimeras and taking all but two members of Vet Squad B. The other Chimera, now empty, tries to get behind the Devilfish.
Things are not looking good for Deathbot!
TURN 7
The Dreadnoughts move closer to the Hammerhead, hoping to crush it with their Power Fists. The Tau's Commander and Bodyguards move to cover and a perfect position to exact alien terror on the advancing Dreads.
The remaining Chimera swings around the corner of the Styrofoam building.
The Devilfish spins around to the flank of the 2-man Tac Squad lending its firepower to the already overwhelming pulse rifle storm from the Firewarrior Team, killing them both handily.
Before we moved to the Assault Phase of Turn 7, Deathbot and I decided to call it a game. We both held our objectives and had little chance (me) to no chance (Deathbot) to deny/take the other players objective.
The game ends a tie. Deathbot is getting the hang of the game and has started to make some good decisions.
Again another fun day (or two) at the Zorcon Household. In the next BatRep, two neighborhood friends of Deathbot join the fray in a three-on-one battle!
Once again, I have sat on a battle report for about a month before posting it. At least I took plenty of pictures!
ARMY LISTS
Deathbot wanted more IG/AM allies this go around. I provided him with a squad of my Adeptus Arbites and a couple 'counts as' Chimeras.
- Terminator Captain (120): Iron Halo; Storm Bolter; Power Sword
- Dreadnought A (120): Searchlight; Smoke Launchers; Assault Cannon; Power Fist; Storm Bolter
- Dreadnought B (100): Searchlight; Smoke Launchers; Multi-melta; Power Fist; Storm Bolter
- Terminator Squad (210): Sergeant; Storm Bolter x4; Power Fist x4; Power Sword; Hvy Flamer
- Tactical Squad A (190): Sergeant; Bolt Pistol x10; Bolter x7; Chain Sword; Flamer; Hvy Bolter; Rhino
- Tactical Squad B (190): Sergeant; Bolt Pistol x10; Bolter x7; Chain Sword; Flamer; Hvy Bolter; Rhino
- Assault Squad (180): Sergeant; Bolt Pistol x10; Chain Sword x8; Flamer x2
- Predator (150): Searchlight; Smoke Launchers; Extra Armor; TL Lascannon; Lascannon x2 (side).
- Imperial Bastion (75): Emplaced Hvy Bolters (x4)
- Lord Commissar (75): Flack Armor; Bolt Pistol; CCW, Melta Bombs
- IG Veteran Squad A * (125): Sergeant; Melta bombs x10; CCW x10; Lasgun x7; Laspistol; Flamer; Grenade Launcher; Demolitions; Chimera
- IG Veteran Squad B (125): Sergeant; Carapace Armor x10; CCW x10; Shotgun x8; Laspistol; Grenade Launcher x2; Grenadiers; Chimera
Total Points: 1745
* As we were setting up, Deathbot wanted to use one of his new IG Heavy Weapon bases given to him by Adeptus-B. I replaced 2 of the members of the squad with a Lascannon Heavy Weapon Team. The point cost does not reflect this change.
I changed up my force a bit using my recently assembled Kroot and a never before used scratch built Drone Sentry Turret Team.
- XV8 Commander + Bodyguards (361): Fusion Blaster x3; Missile Pod x3; Plasma Rifle x3; Target Lock; Shield Drone x6
- Cadre Fire Blade (84): Pulse Rifle; Shield Drone x2
- XV8 Crisis Team (273): Fusion Blaster x3; Missile Pod x3; Plasma Rifle x3; Shield Drone x6
- Stealth Team (170): Shas'vre; Fusion Blaster; Markerlight & Target Lock; Burst Cannon x4
- Fire Warrior Team (204): Shas'ui; Pulse Rifle x10; Devilfish w/ Disruption Pod
- Drone Sentry Turret Team (220): TL Burst Canons x4
- Kroot Carnivore Squad (260): Kroot Shaper; Kroot Rifle x20; Kroot Hounds x10; Krootox/Kroot Gun x3
- Hammerhead (177): TL Smart Missile System; Railgun w/ Solid & Submunitions; Disruption Pod; Seeker Missiles x2
Total Points: 1749
SET UP
The terrain for this game is a small city with canals flowing into a larger river/canal. I have placed "islands" connected by bridges along the water edge.
The mission for this game was "Capture and Control" with a "Dawn of War" deployment. We both placed our "home base" objectives in opposite corners from each other.
Deathbot won initiative and deployed his IG HQ and 2 Troops, placing his commander with vet squad A. Both Chimeras were placed about 1/3 of the way from his left table edge.
I placed my Fireblade and Fire Warriors on the building roof occupied by my objective. The team's Devilfish was placed behind a building to lend fire support for approaching enemies. My Kroot infiltrated into the large grey church to my left of the board.
We both kept our deep strike capable units in reserve.
TURN 1
Deathbot brought on 2 Tac squads in Rhinos to his left then both Dreads and the Predator to his right. Before turn 2 started he realized his mistake by not placing a Tac squad by his Objective. I allowed him to redeploy a Rhino and Tac squad to his far right.
TURN 2
My Kroot continued to fire upon the Dreadnought, again to no effect.
Deathbot's entire right flank fired upon the Grey church, blowing it to smitherenes, killing about 6 Kroot Hounds. Deathbot did not advance, but maneuvered his Chimeras closer to the Bastion, disembarked both Tac squads, and laterally moved a Dreadnought.
TURN 3
We finally see some action this turn.
A disastrous Deep Strike Scatter caused the loss of 3 out of 5 Stealth Suits.
More Deep Strike! Deathbot's Assault Squad, Terminator Squad, and Terminator Captain land on the central building's roof. My Drone Sentry Turret land with open view to both Chimera's sides while my Crisis Team lands behind the central building.
Deathbot advances both Dreads and both Chimeras. I moved the Devilfish to firing range of an advancing Tac Squad.
From this angle you can also see the advancing Tac Squad and my Stealth Team move to (dry) cover.
Vet Squad A and Lord Commissar arrive at the roof of the Bastion.
![]() |
| My losses to this point. Deathbot has lost zero models! |
TURN 4
The advancing Tac Squad, under heavy fire, manages to take out the last two Stealth Suits.
The Kroot finally took out a Dreadnought arm, but have suffered significant losses by this point.
The Hammerhead still remains in deep cover, only letting loose its SMS.
Both Dreads advance as the Kroot hail of bullets switch targets and crack open the Predator.
This Tac Squad covers its Objective while firing at the Kroot, causing them to rout.
Not pictured is the exchange of fire between Deathbot's units on the roof of the central building and my unit behind it. I believe a couple Assault Marines and Shield Drones were the only casualties.
TURN 5
The Assault Marines charge the Crisis Team. I don't recall where the losses came from (last turn's shooting and this turn's charge) but in total 6 Shield Drones, and 4 Marines are lost.
This Tac Squad continues to advance under heavy fire.
Kroot in full retreat.
The kill ratio has finally tipped to the Tau's favor.
TURN 6
My Commander and bodyguards finally show up on turn 6!!!! What?!? That can't be. Somehow we played an extra turn and forgot to count it. We had to stop a number of times and played over the course of two days, so I am not surprised that this happened.
We played on anyway. My Command Squad let lose a barrage of white hot energy and missiles, completely vaporizing the Terminator Squad.
Deatbot's two Dreadnoughts make it across the river, advancing towards the Hammerhead while the Kroot run for their lives.
This Tac Squad is almost whittled away, reduced to two marines.
The Drone Sentry Turrets blew up one of the Chimeras and taking all but two members of Vet Squad B. The other Chimera, now empty, tries to get behind the Devilfish.
Things are not looking good for Deathbot!
TURN 7
The Dreadnoughts move closer to the Hammerhead, hoping to crush it with their Power Fists. The Tau's Commander and Bodyguards move to cover and a perfect position to exact alien terror on the advancing Dreads.
The remaining Chimera swings around the corner of the Styrofoam building.
The Devilfish spins around to the flank of the 2-man Tac Squad lending its firepower to the already overwhelming pulse rifle storm from the Firewarrior Team, killing them both handily.
Before we moved to the Assault Phase of Turn 7, Deathbot and I decided to call it a game. We both held our objectives and had little chance (me) to no chance (Deathbot) to deny/take the other players objective.
The game ends a tie. Deathbot is getting the hang of the game and has started to make some good decisions.
Again another fun day (or two) at the Zorcon Household. In the next BatRep, two neighborhood friends of Deathbot join the fray in a three-on-one battle!
Subscribe to:
Posts (Atom)