
Once again, I have sat on a battle report for about a month before posting it. At least I took plenty of pictures!
ARMY LISTS

Deathbot wanted more IG/AM allies this go around. I provided him with a squad of my Adeptus Arbites and a couple 'counts as' Chimeras.
- Terminator Captain (120): Iron Halo; Storm Bolter; Power Sword
- Dreadnought A (120): Searchlight; Smoke Launchers; Assault Cannon; Power Fist; Storm Bolter
- Dreadnought B (100): Searchlight; Smoke Launchers; Multi-melta; Power Fist; Storm Bolter
- Terminator Squad (210): Sergeant; Storm Bolter x4; Power Fist x4; Power Sword; Hvy Flamer
- Tactical Squad A (190): Sergeant; Bolt Pistol x10; Bolter x7; Chain Sword; Flamer; Hvy Bolter; Rhino
- Tactical Squad B (190): Sergeant; Bolt Pistol x10; Bolter x7; Chain Sword; Flamer; Hvy Bolter; Rhino
- Assault Squad (180): Sergeant; Bolt Pistol x10; Chain Sword x8; Flamer x2
- Predator (150): Searchlight; Smoke Launchers; Extra Armor; TL Lascannon; Lascannon x2 (side).
- Imperial Bastion (75): Emplaced Hvy Bolters (x4)
- Lord Commissar (75): Flack Armor; Bolt Pistol; CCW, Melta Bombs
- IG Veteran Squad A * (125): Sergeant; Melta bombs x10; CCW x10; Lasgun x7; Laspistol; Flamer; Grenade Launcher; Demolitions; Chimera
- IG Veteran Squad B (125): Sergeant; Carapace Armor x10; CCW x10; Shotgun x8; Laspistol; Grenade Launcher x2; Grenadiers; Chimera
Total Points: 1745
* As we were setting up, Deathbot wanted to use one of his new IG Heavy Weapon bases given to him by Adeptus-B. I replaced 2 of the members of the squad with a Lascannon Heavy Weapon Team. The point cost does not reflect this change.

I changed up my force a bit using my recently assembled Kroot and a never before used scratch built Drone Sentry Turret Team.
- XV8 Commander + Bodyguards (361): Fusion Blaster x3; Missile Pod x3; Plasma Rifle x3; Target Lock; Shield Drone x6
- Cadre Fire Blade (84): Pulse Rifle; Shield Drone x2
- XV8 Crisis Team (273): Fusion Blaster x3; Missile Pod x3; Plasma Rifle x3; Shield Drone x6
- Stealth Team (170): Shas'vre; Fusion Blaster; Markerlight & Target Lock; Burst Cannon x4
- Fire Warrior Team (204): Shas'ui; Pulse Rifle x10; Devilfish w/ Disruption Pod
- Drone Sentry Turret Team (220): TL Burst Canons x4
- Kroot Carnivore Squad (260): Kroot Shaper; Kroot Rifle x20; Kroot Hounds x10; Krootox/Kroot Gun x3
- Hammerhead (177): TL Smart Missile System; Railgun w/ Solid & Submunitions; Disruption Pod; Seeker Missiles x2
Total Points: 1749
SET UP


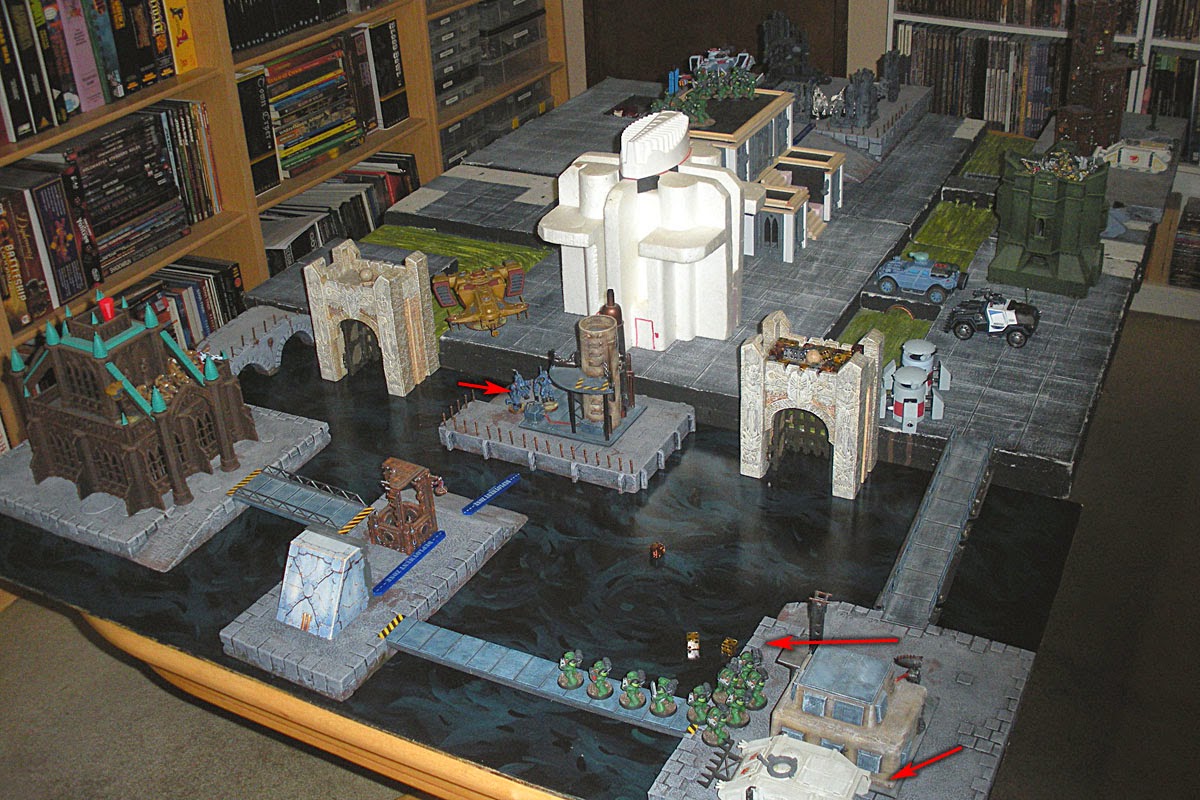
The terrain for this game is a small city with canals flowing into a larger river/canal. I have placed "islands" connected by bridges along the water edge.
The mission for this game was "Capture and Control" with a "Dawn of War" deployment. We both placed our "home base" objectives in opposite corners from each other.
Deathbot won initiative and deployed his IG HQ and 2 Troops, placing his commander with vet squad A. Both Chimeras were placed about 1/3 of the way from his left table edge.
I placed my Fireblade and Fire Warriors on the building roof occupied by my objective. The team's Devilfish was placed behind a building to lend fire support for approaching enemies. My Kroot infiltrated into the large grey church to my left of the board.
We both kept our deep strike capable units in reserve.
TURN 1


Deathbot brought on 2 Tac squads in Rhinos to his left then both Dreads and the Predator to his right. Before turn 2 started he realized his mistake by not placing a Tac squad by his Objective. I allowed him to redeploy a Rhino and Tac squad to his far right.
TURN 2


My Kroot continued to fire upon the Dreadnought, again to no effect.
Deathbot's entire right flank fired upon the Grey church, blowing it to smitherenes, killing about 6 Kroot Hounds. Deathbot did not advance, but maneuvered his Chimeras closer to the Bastion, disembarked both Tac squads, and laterally moved a Dreadnought.
TURN 3
We finally see some action this turn.

A disastrous Deep Strike Scatter caused the loss of 3 out of 5 Stealth Suits.

More Deep Strike! Deathbot's Assault Squad, Terminator Squad, and Terminator Captain land on the central building's roof. My Drone Sentry Turret land with open view to both Chimera's sides while my Crisis Team lands behind the central building.
Deathbot advances both Dreads and both Chimeras. I moved the Devilfish to firing range of an advancing Tac Squad.
From this angle you can also see the advancing Tac Squad and my Stealth Team move to (dry) cover.

Vet Squad A and Lord Commissar arrive at the roof of the Bastion.
 |
| My losses to this point. Deathbot has lost zero models! |
TURN 4

The advancing Tac Squad, under heavy fire, manages to take out the last two Stealth Suits.

The Kroot finally took out a Dreadnought arm, but have suffered significant losses by this point.

The Hammerhead still remains in deep cover, only letting loose its SMS.

Both Dreads advance as the Kroot hail of bullets switch targets and crack open the Predator.

This Tac Squad covers its Objective while firing at the Kroot, causing them to rout.
Not pictured is the exchange of fire between Deathbot's units on the roof of the central building and my unit behind it. I believe a couple Assault Marines and Shield Drones were the only casualties.
TURN 5

The Assault Marines charge the Crisis Team. I don't recall where the losses came from (last turn's shooting and this turn's charge) but in total 6 Shield Drones, and 4 Marines are lost.

This Tac Squad continues to advance under heavy fire.

Kroot in full retreat.

The kill ratio has finally tipped to the Tau's favor.
TURN 6

My Commander and bodyguards finally show up on turn 6!!!! What?!? That can't be. Somehow we played an extra turn and forgot to count it. We had to stop a number of times and played over the course of two days, so I am not surprised that this happened.
We played on anyway. My Command Squad let lose a barrage of white hot energy and missiles, completely vaporizing the Terminator Squad.

Deatbot's two Dreadnoughts make it across the river, advancing towards the Hammerhead while the Kroot run for their lives.

This Tac Squad is almost whittled away, reduced to two marines.

The Drone Sentry Turrets blew up one of the Chimeras and taking all but two members of Vet Squad B. The other Chimera, now empty, tries to get behind the Devilfish.

Things are not looking good for Deathbot!
TURN 7

The Dreadnoughts move closer to the Hammerhead, hoping to crush it with their Power Fists. The Tau's Commander and Bodyguards move to cover and a perfect position to exact alien terror on the advancing Dreads.
The remaining Chimera swings around the corner of the Styrofoam building.

The Devilfish spins around to the flank of the 2-man Tac Squad lending its firepower to the already overwhelming pulse rifle storm from the Firewarrior Team, killing them both handily.
Before we moved to the Assault Phase of Turn 7, Deathbot and I decided to call it a game. We both held our objectives and had little chance (me) to no chance (Deathbot) to deny/take the other players objective.
The game ends a tie. Deathbot is getting the hang of the game and has started to make some good decisions.
Again another fun day (or two) at the Zorcon Household. In the next BatRep, two neighborhood friends of Deathbot join the fray in a three-on-one battle!
No comments:
Post a Comment